Deluxe Cheeseburger Salad
This unexpected spin on the classic burger will delight even the pickiest eaters at the table.
4 sesame seed hamburger bun tops
1 small red onion, divided
2 plum tomatoes
¾ lb 95% lean ground beef
½ cup finely diced dill pickles
¾ cup ketchup
1 tbsp yellow mustard
8 cups thinly sliced romaine lettuce
1 cup (4 oz) shredded cheddar cheese
Preheat oven to 425°F. Slice bun tops into ¼-in. strips (if bun tops are very thick, slice bottoms off
horizontally before slicing into strips). Arrange in a single layer on Large Bar Pan; bake 8-10 minutes or until
lightly toasted. Remove to Stackable Cooling Rack; cool completely.
Slice half of the onion crosswise into thin rings using Ultimate Mandoline fitted with thin slicing blade.
Remove and discard stems from tomatoes; cut tomatoes into quarters lengthwise and slice crosswise using
Utility Knife. Set onion and tomatoes aside.
Cook ground beef in (8-in.) Sauté Pan over medium-high heat 5-7 minutes or until no longer pink,
breaking beef into crumbles using Slotted Turner. Chop remaining onion half using Food Chopper. Finely
dice pickles using Utility Knife. In Classic Batter Bowl, combine chopped onion, pickles, ketchup and
mustard. Add cooked ground beef; mix well using Small Mix ‘N Scraper®.
To serve, arrange lettuce on large serving platter. Spoon beef mixture over lettuce. Top with cheese,
tomatoes and sliced onion. Arrange hamburger bun croutons around edge of platter. Serve immediately.
Yield: 6 servings
Nutrients per serving: Calories 250, Total Fat 10 g, Saturated Fat 5 g, Cholesterol 55 mg, Carbohydrate 20 g,Protein 20 g, Sodium 730 mg, Fiber 3 g
©The Pampered Chef, Ltd., 2008
Thursday, December 17, 2009
Deluxe Mini-Muffin Pan
Have you ever thought that a muffin pan could give you tarts, mini-cupcakes, and mini quiches. I have made many things in our deluxe mini-muffin pan and I have enjoyed them all.
For the holidays, make mini cupcakes and frost them with green icing. Place them on a platter in the shape of a Christmas tree. It's fun, easy, and adorable!
Our deluxe mini-muffin pan has a non-stick surface for easy clean-up.
For the holidays, make mini cupcakes and frost them with green icing. Place them on a platter in the shape of a Christmas tree. It's fun, easy, and adorable!
Our deluxe mini-muffin pan has a non-stick surface for easy clean-up.
Tuesday, December 8, 2009
Batter Bowls

Friday, December 4, 2009
December Host/Guest Special
Hosting a show is a great way to earn some free and half priced products. This month, guests can earn the decorator bottles for free when they spend $60 or more.
Hosts will get a chance to order one item from the Snowmen appetizer plates and stand, stackable cooling racks (set of 2), snowmen rectangle platter, or a set of 4 snowmen appetizer plates for 60% off when their show is $150-$549.99. They will be able to choose the cookie press and one of those items mentioned above at 60% off when their show reaches $550 or more.
There are always great incentives for the hosts and guests. Check in often to see what each month's special is.
Quiche Lorraine Tartlets
The Pampered Chef ®
Quiche Lorraine Tartlets
Recipe
1 pkg (15 oz) refrigerated pie crusts (2 crusts), softened according to package directions
2 eggs
1/2 cup half and half
1/8 tsp salt
4 slices cooked bacon
1/2 medium red bell pepper
2 tbsp finely chopped fresh chives or green onion
1/2 cup (2 oz) grated Swiss cheese
12 grape tomatoes
Coarsely ground black pepper
Additional chopped fresh chives or green onion (optional)
Preheat oven to 400°F. Unroll one pie crust onto lightly floured surface. Spacing closely together, cut 12 disks from crust using outer tube of Measure-All® Cup (nine around outside edge and three in center). Press disks into wells of Deluxe Mini-Muffin Pan using Mini-Tart Shaper, ruffling edges. Repeat with remaining crust.
Whisk eggs, half and half and salt in Classic Batter Bowl using Stainless Whisk; pour into Measure-All® Cup. Set egg mixture aside and wipe out batter bowl with paper towels.
Finely chop bacon and bell pepper with Food Chopper. Squeeze out excess moisture from bell pepper using paper towels. Finely chop chives using Utility Knife. Grate cheese using Ultimate Mandoline. Combine bacon, bell pepper, chives and cheese in batter bowl; mix well using Small Mix ‘N Scraper®.
Pour egg mixture evenly into tart shells; sprinkle evenly with cheese mixture. Cut tomatoes in half crosswise. Press one tomato half, cut side up, into center of each tartlet. Sprinkle with black pepper. Bake 14-16 minutes or until egg mixture is set and crusts are golden brown. Remove tartlets to serving platter and sprinkle with additional chopped chives, if desired.
Yield: 24 servings
Wednesday, December 2, 2009
Mix-All Measuring Cup
Did you ever think that a measuring cup could do more than measure? I've found that the mix-all cup can do something more.
When making friendship bread, you must pour one cup of batter into one of 4 plastic bags. It can be messy to do this with a one cup measuring cup. I took my mix-all measuring cup and put a plastic bag inside it to help hold the bag. Then, using the batter bowl, I poured one cup of batter into the bag. So much less mess that way and so much more helpful.
The mix-all measuring cup measures both dry and liquid ingredients, but now I know that it can help hold a plastic bag when I need it to!
Wednesday, November 25, 2009
Turkey Carving Tips
Oops! I'm a day late with my Tuesday Tip this week. The busyness of Thanksgiving week already has me running behind. I had the great opportunity to use my Tuesday to help serve Thanksgiving dinner at a local community center that our church supports. It's so rewarding to be able to help and to get my two kids involved at a young age with helping others, too.
With Thanksgiving upon us, here's a great video that explains how to carve a turkey.
Have a great Thanksgiving!
With Thanksgiving upon us, here's a great video that explains how to carve a turkey.
Have a great Thanksgiving!
Friday, November 20, 2009
$140 in free products
Did you know that hosting a Pampered Chef show is a great way to earn LOTS of free cookware and utensils for your kitchen?
Several of my hosts have earned $140 in free products because the total sales at their shows totaled more than $700 - although the benefits kick in with sales of just $150.
For example, here's what one of my recent hosts ordered for herself:
1 Mini-Tart Shaper
1 Baster & Cleaning Brush
1 Professional Shears
1 Bar Board
1 Deep Covered Baker
1 Executive 8" Saute Pan
(Those items add up to $163 - but she owed just $17)
She also could pick any three items for half price.
Overall, she got $376 worth of products for $123.
The amount of free product and half-price items varies depending on the sales total of the show. Contact me for details. I'd love to help you fill your kitchen for free.
Three-cheese Garden Pizza
Here's a simple and delicious recipe that I made quite often at shows when I was first getting started. It's healthy and can be prepared in about 45 minutes.
Ingredients:
1 pkg (13.8 oz) refrigerated pizza crust
1 tbsp vegetable oil
2 garlic cloves, pressed
1 cup (4 oz) shredded cheddar cheese
1 cup (4 oz) shredded mozzarella cheese
¼ cup (1 oz) grated fresh Parmesan cheese
1 tsp Italian seasoning
1 small onion, sliced into rings
2 plum tomatoes, sliced
1 medium zucchini, sliced
1 cup sliced mushrooms
1. Preheat oven to 400°F. Unroll dough onto bottom of lightly greased Large Bar Pan. Gently stretch dough to evenly cover the bottom of the pan. Place oil in (1-cup) Prep Bowl. Press garlic into oil using Garlic Press; brush evenly over dough using Chef’s Silicone Basting Brush. Bake crust 7 minutes. Remove from oven; place on Stackable Cooling Rack.
2. Meanwhile, grate cheddar and mozzarella cheeses using Ultimate Mandoline fitted with grating blade; place in Classic Batter Bowl. Grate Parmesan cheese over batter bowl using Microplane® Adjustable Grater. Add Italian seasoning to cheeses using Adjustable Measuring Spoon; toss lightly using Small Mix ’N Scraper® and set aside. Using Ultimate Mandoline, slice onion and tomatoes using v-shaped blade; slice zucchini using crinkle cut blade. Slice mushrooms using Utility Knife.
3. Sprinkle half of the cheese mixture evenly over crust; top evenly with onion, zucchini, tomatoes and mushrooms. Sprinkle with remaining cheese mixture. Bake 15-18 minutes or until crust is golden brown; remove from oven to cooling rack. Cut into squares using Pizza Cutter. Serve using Mini-Serving Spatula.
Yield: 6 main dish servings or 12 appetizer servings
Tuesday, November 17, 2009
Cutting Board
Have you heard that glass cutting boards can dull your knives? When I learned this, I stopped using mine. The Pampered Chef cutting boards are made of a durable material that won't dull knives.
The Pampered Chef cutting boards come in three sizes. They are made with rubber edges so that they grip the counter top and don't slip or slide around while you are cutting. On one side of the rubber edges, there are standard and metric markings so that you can cut uniform pieces. All of the cutting boards are usable on both sides, and they are dishwasher safe.
The Pampered Chef cutting boards come in three sizes. They are made with rubber edges so that they grip the counter top and don't slip or slide around while you are cutting. On one side of the rubber edges, there are standard and metric markings so that you can cut uniform pieces. All of the cutting boards are usable on both sides, and they are dishwasher safe.
Friday, November 13, 2009
Microwave White Chicken Chili
Colder weather means its a perfect time to start cooking up some chili. Here's a great recipe I found for some white chicken chili.
Ingredients:
3 whole heads garlic (about 48 cloves), unpeeled (this may seem like a lot but "roasting" them in the microwave lends a mild, mellow taste)
¾ tsp salt, divided
3 tbsp olive oil, divided
2 poblano peppers
1 medium onion
1½ lb boneless, skinless chicken thighs
2 tbsp Southwestern Seasoning Mix
2 cans (15.5 oz each) Great Northern beans, drained
1 jar (16 oz) salsa verde
1. Using (5-in.) Santoku Knife, slice about 1/4 in. off the pointed top of garlic heads to expose
cloves. Place garlic cut side up in Classic Batter Bowl. Sprinkle garlic with 1/4 tsp of the salt and
drizzle with 2 tbsp of the oil. Cover batter bowl with lid; microwave on HIGH 3 minutes or until
garlic is soft. Set aside to cool.
2. Meanwhile, finely dice peppers using Santoku Knife. Chop onion using Food Chopper. Combine
peppers and onion in Deep Covered Baker. Trim and finely dice chicken using Boning Knife.
Add chicken, seasoning mix, remaining 1 tbsp oil and remaining 1/2 tsp salt to baker; mix well
using Master Scraper. Microwave, covered, on HIGH 4 minutes; stir to separate chicken. Cover;
microwave an additional 4-6 minutes or until chicken is cooked through.
3. Meanwhile, gently squeeze cooled garlic from heads into batter bowl (discard skins); mash using
Mix ‘N Masher. Add beans and salsa to batter bowl. Transfer bean mixture to baker; mix well.
Microwave, covered, on HIGH 5-7 minutes or until chili is heated through.
Yield: 8 servings (8 cups)
Thursday, November 12, 2009
Cheesy meat loaf and potato wedges
Last night, I used two of my favorite items to make a meal that everyone loved. In fact, there weren't even any leftovers.
I baked a cheesy meat loaf in the Deep Covered Baker, aka the Magic Pot, and I used my Large Bar Pan to roast some potato wedges.
To prepare the meat loaf, I mixed the beef with egg, shredded cheese and onion. After baking for about an hour, I put a bit of ketchup on top and baked for a few more minutes. You can also make meat loaf in the microwave using the Deep Covered Baker in about 15 minutes.
I cut several potatoes into wedges, tossed them in oil and then sprinkled them with salt and garlic powder. I baked them for 30 minutes.
Tuesday, November 10, 2009
Large Bar Pan
Have you ever wondered what it would be like to use one pan for every meal?
The Large Bar Pan from Pampered Chef is perfect for all kinds of things. I love to cook bacon on it because it is so easy to clean. You can cook a whole package of bacon and then eat it now or save it for sandwiches later.

For lunch, you can put 6 grilled cheese sandwiches on it and they cook in 15 minutes. The great part is that you don't have to flip them!
For dinner, you can roast vegetables or cook chicken breasts on it. For dessert, cookies or brownies.
What a great tool to help make your work as a cook easier! The clean up is simple, too. All you need is hot water and a nylon scraper!
The Large Bar Pan from Pampered Chef is perfect for all kinds of things. I love to cook bacon on it because it is so easy to clean. You can cook a whole package of bacon and then eat it now or save it for sandwiches later.

For dinner, you can roast vegetables or cook chicken breasts on it. For dessert, cookies or brownies.
What a great tool to help make your work as a cook easier! The clean up is simple, too. All you need is hot water and a nylon scraper!
Friday, November 6, 2009
Double Chocolate Mousse Cups
Want to impress your friends and family with a fun dessert? Check out The Pampered Chef ®
Double Chocolate Mousse Cups
Recipe
Waffle Cups
1/2 cup semi-sweet chocolate morsels
1 pkg (4 oz) prepared waffle bowls (10 bowls)
Mousse & Garnish
1/2 cup white chocolate morsels
1 cup cold milk
1 pkg (3.3 oz) white chocolate instant pudding and pie filling
1 container (8 oz) frozen whipped topping, thawed
3 tbsp sliced almonds, toasted
1 container (6 oz) fresh raspberries
For waffle cups, place semi-sweet morsels in Prep Bowl. Microwave on HIGH 60-90 seconds or until melted and smooth, stirring every 15 seconds. Dip Chef's Silicone Basting Brush into chocolate. Swirl basting brush around inside walls of waffle bowls, replenishing brush with chocolate as necessary.
For mousse, place white chocolate morsels into another Prep Bowl. Microwave on HIGH 60-90 seconds or until melted and smooth, stirring every 15 seconds. Combine milk and pudding mix in Classic Batter Bowl; whisk using Stainless Whisk until thickened. Add melted white chocolate; whisk until smooth. Fold in whipped topping using Small Mix ‘N Scraper®.
Coarsely chop almonds using Food Chopper. To assemble cups, spoon mousse into gallon-size resealable plastic bag. Trim corner of bag with Utility Knife; using a circular motion, pipe mousse evenly into cups. Sprinkle mousse with almonds and top with raspberries.
Yield: 10 servings
ENJOY!
© The Pampered Chef used under license.
Thursday, November 5, 2009
November Host Special
Every month there are some great incentives to host a Pampered Chef show.
This month hosts and guests alike will love the discounts on the Simple Additions pieces and Dots barware. Hosts can save 60% off of select pieces from two different levels. If their show sales are between $150 and $549.99, they can choose one piece from level one. If their show sales are $550 or more, they can choose two pieces from level one or level two or one from each level. (See me for details.)
Guests can purchase as many pieces as they want at 20% off. NO LIMITS! There are 32 items to choose from. Our Simple Additions and Dots barware can spice up any home! Get yours today.
Tuesday, November 3, 2009
Pork Tenderloin in 15 minutes?
Yes, it's true. One of my favorite dishes to prepare at cooking shows is a juicy pork tenderloin - done in 15 minutes in the microwave.
Before I get into the details, I have to tell you that the secret is something we've dubbed "The Magic Pot." Officially, it's the Deep Covered Baker, but whatever you want to call it, it's the best investment I've made in my kitchen in years.
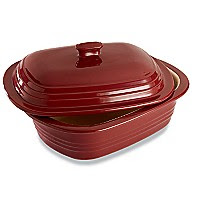
The Deep Covered Baker is made of stoneware. Like our other stoneware pieces, it can be used in the oven, microwave and freezer. And it's easy to clean.
So back to the tenderloin. Prepare it by brushing it with oil and a rub of your choice, garnish with onions and potatoes or leave it by itself, put it in the microwave on high for 10-12 minutes, take it out and let it sit for 10 minutes - the amazing thing is the meat continues to cook once it's been removed from the microwave.
Voila! A tasty, healthy meal with meat and veggies in less than half an hour.
That's one great recipe with the Deep Covered Baker. I've got dozens more I'll share with you in upcoming posts.
Before I get into the details, I have to tell you that the secret is something we've dubbed "The Magic Pot." Officially, it's the Deep Covered Baker, but whatever you want to call it, it's the best investment I've made in my kitchen in years.

So back to the tenderloin. Prepare it by brushing it with oil and a rub of your choice, garnish with onions and potatoes or leave it by itself, put it in the microwave on high for 10-12 minutes, take it out and let it sit for 10 minutes - the amazing thing is the meat continues to cook once it's been removed from the microwave.
Voila! A tasty, healthy meal with meat and veggies in less than half an hour.
That's one great recipe with the Deep Covered Baker. I've got dozens more I'll share with you in upcoming posts.
Monday, November 2, 2009
Holiday Shopping Open House
It's that time of year again. Time to start thinking about holiday gifts for all of those special people in our lives - moms and dads, brothers and sisters, uncles and aunts, teachers, school bus drivers - the list gets pretty long.
Did you know that Pampered Chef has more than 100 items for $20 or less? Any of these would make perfect gifts.
I'll be hosting an Open House Sunday, Nov. 8 from 5-7 p.m. and Monday, Nov. 9 from 5-7 p.m. Stop by to see some of the great items that are available.
Did you know that Pampered Chef has more than 100 items for $20 or less? Any of these would make perfect gifts.
I'll be hosting an Open House Sunday, Nov. 8 from 5-7 p.m. and Monday, Nov. 9 from 5-7 p.m. Stop by to see some of the great items that are available.
Welcome to Jen's Kitchen Tips
Hi everyone!
Wow! I can't believe I'm starting a blog - and just weeks after I got on Facebook. I'm really not that computer savvy.
I'm so excited to have a place to share the things I've learned this year as a Pampered Chef consultant.
I was always invited to several shows a year, and I was always the one who left the show without buying anything - at least most of the time.
Then, in early 2009, I got the bug to start my own Pampered Chef business. Not only have I been able to earn some extra money, but I've discovered just how wonderful the products are. They've helped be much more creative in the kitchen, and they've helped me save time and money while preparing healthier meals for my husband and sons.
I can't wait to share some of the cool tips and tricks I've learned, and some of the tasty recipes I've tried.
Thanks for reading.
Subscribe to:
Posts (Atom)
